News

NerdAxe Setup Guide: Easy Step-by-Step Instructions for Beginners

Easy NerdAxe Setup Guide

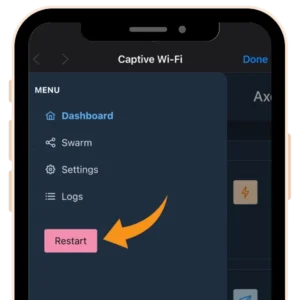
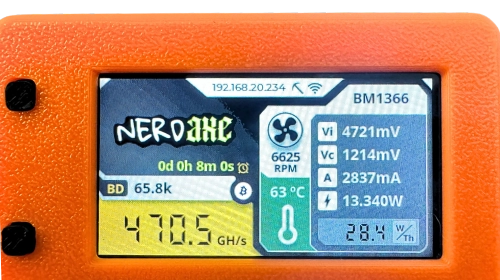
Welcome to the NerdAxe Setup Guide

This guide will help you set up your NerdAxe Solo Bitcoin Miner quickly and efficiently. Whether you are a beginner or an experienced miner, this step-by-step tutorial will provide you with all the information you need to get started.

What you need

Overview Icon

PRO TIP

Ensure you have your BTC wallet address copied before you start the setup process. If not, you'll be stuck at step 4 and need to restart the process.

NerdAxe Setup Guide: An Easy How-To

1

Connect Your NerdAxe Ultra

  1. Plug in the NerdAxe: Connect the device to the included power adapter.
  2. Wait for WiFi Message: After powering-up, wait for the WiFi message "CONFIG WIFI PORTAL SSID: Nerdaxe_XXXX" to appear on the NerdAxe screen.
NerdAxe Setup Guide Initializing
NerdAxe Setup Guide Wifi screen
2

Connect to NerdAxe WiFi

    1. Open WiFi Settings: On your smartphone or computer, navigate to the WiFi settings.
    2. Select Network: Choose and connect to the network named “Nerdaxe_XXXX”.
NerdAxe Setup Guide Connect Wifi
3

Access the Dashboard

  1. Open the AxeOS: After connecting, you will be directed to the main page of the user interface (dashboard).
NerdAxe Setup Guide AxeOS dashboard
4

Configure Settings

  1. Open Settings Menu: On the dashboard, access the settings menu.
  2. Choose hostname: Input your preferred hostname
  3. Input Wifi SSID: Type in your chosen Wifi network SSID, where you want your NerdAxe connect to.
  4. Wifi Password: Type in the password for your selected Wi-Fi network.
  5. Pool Settings: The default pool settings are preset to `public-pool.io`. You can customize these if desired but sticking with the default is usually advisable.
  6. Enter Bitcoin Address: Provide the Bitcoin address in the Stratum User field where you want to receive block rewards. We suggest using a SegWit address starting with 'bc1q'. You can keep the worker name at the end, e.g. Nerdaxe
NerdAxe Setup Guide Settings
Overview Icon

PRO TIP

Set up your own personal mining pool using Liquid Box V3 Bitcoin node. It lets you use your own equipment and software, keeping your privacy intact. Plus, you'll contribute to the network's strength and safety without needing 3rd party mining pools.

5

Save and Restart

  1. Click Save: After entering your information, click the “Save” button.
  2. Restart the Device: Open the menu and click on “Restart” to apply the changes.
NerdAxe Setup Guide Restart
6

Start Mining

  1. Connect to WiFi: The NerdAxe will now connect to your WiFi network.
  2. Begin Mining: After a few seconds, the mining process will start automatically.
NerdAxe Setup Guide Start Mining

Additional Tips for Successful Mining

  • Bitcoin Wallet: If you don’t have a Bitcoin wallet, set one up before configuring your NerdAxe. Consider using a hardware wallet for better security.
  • Monitor Your Mining: Check if your NerdAxe is connected to the mining pool by visiting public pool and entering your Bitcoin address.
  • Display Options: Use the bottom button on the NerdAxe to cycle through different display information.
  • Support: Should you encounter any issues during setup, shoot us a message via our contact form or write an email, we are happy to help.

Congratulations! Your solo miner is now set up and ready to mine. Enjoy your journey into the exciting world of crypto mining.

Happy hashing!

Leave a Reply